Sunday 16 November 2014

New Free Pattern: The Commuter Cowl

Evening Rush Hour London Victoria

Another experiment in simple lace knitting. This project was conceived of and completed during the daily commute and that's how it came to its name, the Commuter Cowl. 

The cowl's lace pattern gives the impression of vertical ribbing, which is achieved by a simple lace sequence, ideal for beginner lace knitters.

The project is extremely portable and the pattern's lace rows are followed by simple knit rows, making this an ideal beginner project. The cowl is knitted entirely in the round.


Saturday 15 November 2014

Update on that "Bag of Weed"

My so-called "sabbatical" ended unexpectedly at the onset of October. This accounts for the silence on the blog, which I'm about to interrupt with a post on blocking.

Blocking again! I don't seem to be able to get away from the topic of blocking.

Commuter Cowl blocking, draped around dressmaker's dummy

Saturday 27 September 2014

Why Knitting for Charity? Why Knitting for Pine Ridge?


The onset of yet another Age UK / Innocent Big Knit campaign prompted me to start reflecting on charity knitting. Perhaps, I should mention that the topic of charitable knitting is vast: Some charity knitters specialise in particular accessories required by hospital patients, those in remission or patients with chronic conditions. Others knit for animal shelters. Some of us also produce custom-made items, clothes for birds after oil spills, for example. I also thought of those knitters, who produce clothing for premature babies and especially those of us, who cast-on for baby burial gowns.

Talking about charity knitting can thus come across as bleak, and this is perhaps one of the reasons why I've so far always refrained from writing about it. After all, this blog is intended to be my creative leisure pad. I'm also aware that knitters generally have strong opinions when it comes to discussions on charitable knitting, with some of us raising the question whether there is a place for charitable knitting in this day and age, given the abundance of mass-produced clothing. 


Badlands, Pine Ridge Reservation, Photo: Patrice Ouellet, more here.

Friday 26 September 2014

On the topic of Charity Knitting...The Big Knit is back!

The Big Knit is back for 2014. Needless to say, it's one of my favourite fund-raising campaigns, but as a knitter you may rightfully accuse me of partiality.

For all those, who are not familiar with the Big Knit, it's an established, large-scale,  fundraising campaign, which takes full advantage of the good nature, creativity and reliability of the knitting community. 

Innocent / Age UK, Big Knit 2014. 

Thursday 25 September 2014

Waldorf Knitting Patterns

An advertising leaflet for the local Steiner Kindergarten / School in Canterbury came through my letterbox a few weeks ago. Due to the lack of offspring of my own, the advertising was completely lost on this household, but it prompted me to think of the Steiner Curriculum, in which knitting still forms an integral part. It also reminded me of the traditional Waldorf dolls, which I vaguely remember from my childhood.

The examples below, even though some of the projects displayed are Waldorf-inspired rather than original Waldorf patterns, provide an idea of the kind of style I have in mind. Further details on these are available here. 

Waldorf and Waldorf - Inspired knitting projects on Pinterest. Available here.

Sunday 21 September 2014

A Gallery of Ammonites

In a recent post on a new design, I briefly reflected on why I enjoy creating my own knitting patterns. It turns out that I secretly take pleasure in the hardship of the creative process: choosing yarns, counting stitches, knitting swatches, discarding those swatches and so on, until I arrive at combinations that can be turned into a viable design. 

Ammonite in Moonlight Sonata (James C Brett Yarns) 

Monday 15 September 2014

Damn Damsons: Foraging in Kent

I'm the victim of my own frugality. If the opportunity arises, I simply have to forage. The prospect of turning wild-growing, Kentish damsons into jam was just too tempting. 


Wild Kentish Damsons


About 20 minutes of intensive damson harvesting in the more affluent outskirts of Sittingbourne produced roughly 3 kilos of destoned damsons. Despite the presence of gloves in the house, I opted to destone the damsons with my bare hands. (I'm so hardcore.) 


Thursday 11 September 2014

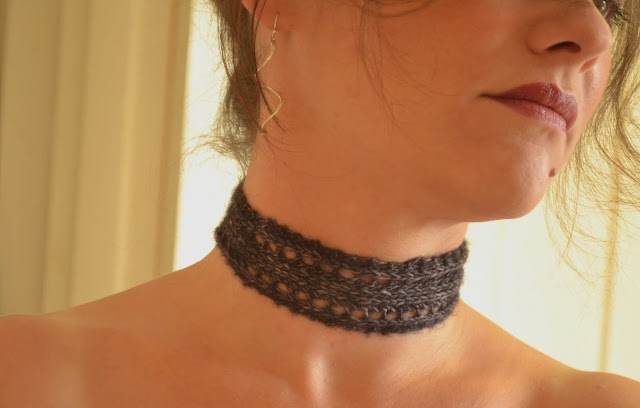
Free Pattern: The Nameless Choker

Nameless


The Nameless Choker is a simple and quick lace project, specifically designed to use up a small quantity of sock yarn (approximately 10 - 20 grams), i.e. roughly the amount of yarn you might have lying around following the completion of a larger project. The quantity of yarn I used for my choker hardly registered on my set of kitchen scales and the above estimate is rather conservative.

It is also an ideal pattern for beginner lace knitters, wishing to get to grips with two of the most common knitting decreases (k2tog and ssk), without having to commit too much time or too many resources; or for all those knitters who enjoy creating knitted accessories and jewellery, either for themselves or for others.


Materials

You will require the following materials:

  • approximately 10 - 20 grams of sock yarn (for my choker I used Madelinetosh Tosh Merino Light Sock Yarn in Victorian Gothic)
  • 3mm knitting needles (or the size specified by the yarn manufacturer)
  • scissors
  • darning needle 
  • 2 buttons 

Nameless Choker in Progress

Gauge

Gauge is not essential for this project but you should have a rough idea of how stretchy your chosen yarn is. This is a made-to-measure project, and as neck circumferences differ, you will have to regularly check whether your choker has reached the desired length. If you decide to knit this project with an unfamiliar yarn and you are not entirely sure how far it will stretch after blocking, it may be beneficial to knit a small gauge swatch and block this in order to get an idea of how the yarn will behave and, most importantly, to check its stretch.


Nameless Choker in Progress


Project Instructions

  • Set - up:

    • Cast on 12 stitches, using whichever cast-on method you are most comfortable with.
    • Knit 4 rows

Once you have completed the set - up, you are ready to start on the lace sequence of the pattern:

  • Lace Pattern:

Row 1: K3, YO, K1, K2tog, SSK, K1, YO, K3
Row 2: K2, P8, K2
Row 3: Repeat Row 1
Row 4: Repeat Row 2

Keep repeating the above sequence until both ends of the choker almost meet, when it is fitted for measuring. Bearing in mind that the choker should fit relatively tightly around the neck, I left a gap approximately as wide as the top of my index finger to allow for a snug fit following blocking. 

When your choker has reached the desired length, stop knitting the lace sequence on a purl row. Next, continue knitting three rows in garter stitch and proceed to bind off.

Nameless in Madelinetosh Tosh Merino Light (Victorian Gothic)
  • Blocking:

Blocking your choker is an absolute must in order to open up the lace. I opted for wet-blocking.

  • Finishing:
Following blocking, it is time to sew in ends and to add two buttons for fastening the choker. The buttons can be attached to either end of the choker. I decided to place mine on the cast - off edge, as this usually turns out slightly wider, directly underneath the openings of the yarn over increases. The  first holes created by the yarn over increases on the opposite end will serve as button holes.

Your choker is ready to be worn. 

Nameless in Madelinetosh Tosh Merino Light (Victorian Gothic) 

Enjoy!

! Update: One year on, I am revisiting the Nameless Choker. I am currently in the process of adapting the pattern to non-traditional knitting materials (cotton thread / leather etc). More on this venture is available here. !

! Update: I have designed another lace choker pattern (image below), the Brocade Choker. My pattern is available here. !

Brocade Choker Knitting Pattern


For pattern support, please feel free to contact me via Ravelry (ClariceAsquith), Twitter (@Slipstitched), leave a comment below or by e-mail: clarice.asquith@googlemail.com.

This pattern is for personal use only and may not be reproduced for commercial purposes without permission.

An update on knitting a variation of this pattern (pictured below) with non-traditional materials is available here


Nameless Cuff, More here.


Nameless Cuff, More here.

© 2014 Clarice Asquith. All rights reserved. http://makedoandmendnovice.blogspot.com

Tuesday 2 September 2014

Lichen and Musings on Yarn Dyeing


Lichen on Apple Tree (Kent, UK)

A few days ago, I had the pleasure of spending an entire day in an apple orchard somewhere in West Kent. For all those not familiar with the county of Kent, West Kent is commonly associated with Royal Tunbridge Wells. It is, as it were, the posh half of Kent. It offers textbook Kentish countryside combined with easy access to London: hops, oast houses, apples and a so-called "high-speed" rail link to the capital. 


Laxton Superb

Friday 8 August 2014

Those remnants of precious sock yarn


Choker in Madelinetosh Tosh Merino Light 

Following completion of a project, all of us are faced with the challenge of putting yarn left overs to good use. Some of my spare yarn gets turned into swatches and smaller amounts end up as stitch markers. Yet, in the case of precious sock yarn, I always try to create a small pattern specifically designed for the amount of surplus yarn.

The remnants of the Madelinetosh Tosh Merino Light, which I used for the Freestyle Raglan Cardigan, were turned into a choker. 


Saturday 2 August 2014

A Sneak Peek of the New Pattern

At the moment it's still unblocked, but here is a preview of my new pattern, the Commuter Cowl. The pattern should be available on the blog by the beginning of September.

Commuter Cowl in Araucania Botany Lace

I used approximately half a skein of Araucania Botany Lace.

More information on Botany Lace is available here.


Sunday 20 July 2014

A New Pattern for Araucania Botany Lace

I am currently swatching for a new pattern, which is due for publication in autumn 2014, with Araucania Botany Lace.

Sometimes, I just don't want to follow a pattern. So, I create my own. Not least because I secretly enjoy going through the hardship of counting stitches, knitting swatches, changing needles and knitting more swatches. Just for the sake of it.

Today's swatch competition was won by Araucania Botany Lace.


Swatch in Araucania Botany Lace

Apparently, Araucania Yarns are ethically sourced, at least this is what it says on their Facebok page. Apart from an entry on facebook, I couldn't find an active page when searching for the manufacturer's website (presumably: http://www.araucaniayarns.com/ ), but I wasn't searching too hard.  

Saturday 19 July 2014

Dear Pebble, this post is dedicated to you...

...I know it's pretty hot today, but that's no justification for this...


Follow my blog with Bloglovin

The Hidden Treasures of Mayfair: Mount Street Gardens

Hidden in the backstreets of northern Mayfair, just off Mount Street and a stone's throw away from the American Embassy, there is an oasis of tropical tranquility right in the heart of London: Mount Street Gardens.

Mount Street Gardens, Mayfair London

Saturday 5 July 2014

Sunday 22 June 2014

Saturday 14 June 2014

This Afternoon's Yarnographic Outtakes

Featuring Mietze and one skein of AraucanĂ­a Botany Lace.

One could get the impression Mietze enjoys having her photo taken...


Sunday 11 May 2014

The Freestyle Raglan Cardigan - Project Instructions

Surprisingly pleased with my first freestyle raglan cardigan, I decided to knit another, this time keeping a record of my project instructions.


Knitted seamlessly from the top down, this is a made to measure project without a written pattern as such. 

The number of cast - on stitches depends on your gauge swatch, your own measurements, the chosen needle size and the type of wool you are using. The pattern allows for modifications at every step of the way and what follows are my instructions for a cardigan in size S, knitted in stockinette stitch, with garter stitch edging at the bottom.

Should you wish to use another stitch motif, you simply have to knit the gauge swatch in the desired stitch and derive your measurements from your test swatch.


I used the following materials:

  • Yarn: Madelinetosh, Tosh Merino Light (Sock Yarn) - 1 hank

  • Needle: 5mm (US size 8) circular needle, 4 double - pointed needles (5mm / US size 8)

  • Scrap yarn, 4 stitch markers, scissors, darning needle 


Madelinetosh Tosh Merino Light Sock Yarn, Colourway: Victorian Gothic


Madelinetosh Tosh Merino Light Sock Yarn, Colourway: Victorian Gothic


Prepare your gauge swatch and block it in whichever way you see fit. Count the stitches and calculate the number of stitches against the measurement of the gauge swatch: In my gauge swatch, 26 stitches in stockinette stitch measured 10cm exactly. 


Gauge swatch in stockinette stitch.


Next, you will have to determine how many stitches are required for the neckline of your cardigan. You can either measure yourself or, as this is not always as straightforward, opt to measure the neckline of an existing garment. My neckline measurement was 51cm.

Once you have determined the neckline measurement, you calculate the number of stitches to be cast on proportionally:

The general calculation looks as follows:

(measurement of desired neckline x number of stitches in swatch sample) / measurement of swatch = number of required stitches 

For my cardigan, the calculation looks like this: 

(51cm x 26sts) / 10cm = 132.6sts


I rounded the stitch total to 135, in order to easily divide the stitches between the various sections.


Once you have determined the number of stitches required, you are ready to start knitting:


Cast on 135 stitches:

  • 1st row: knit all stitches
  • 2nd row: purl all stitches

(After completion of this row, I decided to incorporate a button hole at the beginning of the next row, but this is entirely optional.)

Next, divide stitches between markers for the front, back and the two sleeve sections: 

  • 45 for the back section, 46 in total for the front sections and 22 stitches for each sleeve section
  • 3rd row: knit 23, place marker, knit 22, place marker, knit 45, place marker, knit 22, place marker, knit 23
  • 4th row: purl, slipping markers as you complete the row

From the next row onwards, you start the Raglan increases. Until you are able to fit your arms comfortably through the sleeve sections, the number of stitches will have to be increased as set out below.

  • 5th row: knit to two stitches before 1st marker, kfb, knit, slip marker, kfb, knit to two stitches before next marker. Continue increasing the stitch count as set-out above until the row row is complete, increasing one stitch before and after each marker.
  • 6th row: purl all stitches slipping markers as you complete the row


Continue in stockinette stitch, increasing stitches before and after each marker on every knit row as shown above.

Continue knitting in stockinette stitch until your arms fit through the sleeves. (I increased the sleeve sections from 22 stitches to a total of 45 stitches between markers.) 

When the sleeves are wide enough and the fit is comfortable, proceed as follows:

  • Knit to 1st marker, remove marker, place all stitches between markers on scrap yarn. Remove second marker. Join first front section with back section, continue knitting to second sleeve section, remove first marker, place stitches between markers on scrap yarn, remove second marker, join back section with second front section. Proceed to knit until end of row. 


Proceed to knit in stockinette stitch, removing all markers until your cardigan has reached the desired length. (You will have to keep checking the fit of the cardigan whilst knitting.)

Once your cardigan has reached the desired length, knit 4 rows in plain garter stitch (to avoid rolled edges) and bind off.


Having completed the Torso, it's time to move on to the sleeves: 

As pictured above, the live sleeve stitches are held on scrap yarn. Divide these stitches evenly between 3 double - pointed needles and remove the scrap yarn. To give the sleeves a neater look and to avoid the appearance of "underarm holes", pick up a few stitches underneath the arms, where the front and back sections were originally joined. This will stabilise the sleeve and create an overall tidy appearance.

It is now up to you to decide, how long the sleeves should be. As I wanted to use one skein of sock yarn exactly, I settled for short sleeves, which only required me to knit three rows in the round until bind-off. 

Once you have completed the sleeves, your cardigan is ready to be blocked.

As this garment is knitted in one piece, blocking can be quite a challenge and I decided to pin it against my dressmaker's dummy, whilst steam - blocking the fabric.  


Should you require pattern support, please feel free to contact me via Ravelry or leave a comment below.

This pattern is for personal use only and may not be reproduced for commercial purposes without permission.


© 2012 Clarice Asquith. All rights reserved. http://makedoandmendnovice.blogspot.com


Sunday 30 March 2014

A Lesson in Hanging on...until the time is right for steam blocking

Introducing The Freestyle Raglan Cardigan


A rather interesting project, one that's been on the needles since August 2011. At the time, I attempted my first cardigan. I wasn't following a "pattern", instead the project was knitted top - down, according to swatch and proportion.

As mentioned, no written pattern was followed as such, just basic project instructions along the lines of: 

Measure swatch, measure yourself, block swatch, calculate stitches required around collar in proportion to swatch sample, cast on equivalent number of stitches, divide stitches, place markers, memorise increase pattern, go forth and knit ...


Sunday 23 March 2014

Substituting Rowan Kidsilk Haze (again)

Introducing the Wisp

The pattern was created by Canadian designer Cheryl Niamath and originally published in Knitty's summer 2007 edition.  The pattern instructions call for either Elann Super Kydd or Rowan Kidsilk Haze. As I have successfully substituted Rowan Kidsilk Haze with Patons UK Misty in a previous project, I decided to use Patons UK Misty for my Wisp. And once again, Misty didn't disappoint.
  
Unfortunately, Misty has by now been discontinued, but it can occassionally be found for sale on both ebay and ravelry. Misty's composition (70% Mohair, 30% Polyamide) is not as luxurious as Kidsilk's but it serves as a fantastic substitute for all Knitters, who want to work with fingering weight yarn without having to pay the price for Kidsilk Haze, which currently retails at just under £9.00 per ball.


Wisp (Yarn: Patons UK Misty, substituting Rowan Kidsilk Haze)

Saturday 22 March 2014

There and Back Again....

Gallery of a Public Transport Knitter


Some Vital Statistics

Excluding the London Underground network, 2.5 million people commute to work by rail in the United Kingdom every day. More than a third of those commute to work to and from London. With a population of 13,614,409, the London commuter belt, which is also defined as the Southeast Metropolitan Area, is the largest in the European Union. The geographical boundaries of the Southeast Metropolitan Area are in constant flux. As the urban sprawl continues ever on and transport links are improved or created, it is expected to further expand.

My stretch of the line is operated by Southeastern. 70% of Southeastern's services transport passengers from Kent and parts of East Sussex to the major London termini. On their website Southeastern claim to be transporting 570,000 commuters to the capital every weekday morning. I happen to be one of them.


Sunday 16 March 2014

The Garter Stitch Brain Cleanser ...or Can you Block Acrylic Yarn?


Baktus Scarf


Update: Project notes for a modified brain cleanser baktus are now available here.

Strikkelise's Baktus pattern  has been on my "to -knit-list" for quite a while, but I had never quite gotten into the right state of mind for a project knitted entirely in garter stitch until now. Knitting in garter stitch throughout can be quite a repetitive endeavour, which I highly recommend as a brain - cleansing activity. To incorporate a little more of a challenge, I decided to knit my Baktus in two colours and I wanted to use the most inexpensive yarn I could find in my cupboard (...and still achieve a presentable look).

The yarn for this project was a charity shop find. I was unable to ascertain the manufacturer and only have a vague idea on the composition. A label on the inside of the heather - coloured cone tells me that the yarn contains 30% wool, with the remainder being acrylic. I assume that the same applies to the grey cone, but I could be wrong. I also assume that  Yeoman's are the manufacturers of the yarn. (Yeoman's produce machine knitting yarn, which is sold on cones.) But I could be wrong on this, too.


Sunday 9 March 2014

The Last of the Vintage...or an ideal yarn for beginner lace knitters

...and with a little melancholy, I note that I have used up the last balls of Patons UK Vintage. Well, never mind I'm quite happy with the finished object.


Introducing: The Oaklet, aka the Last of the Vintage

The designer is Megan Goodacre. The yarn (Paton's UK Vintage) was purchased a long time ago at Kemp's and has long since been discontinued. I have used Vintage in several projects and, even though it's not an overtly pretty yarn (in all honesty, the colourways are somewhat questionable), I feel a little sad to see it go. 


Megan Goodacre's Oaklet Shawl Pattern

The Weekly Swatch, Part 4 - The Drop Stitch

Drop Stitch Knitting
Drop Stitch 


I'm currently swatching for new projects and seem to have developed a preference for the drop stitch motif. The drop stitch effect is achieved by working a succession of multiple yarn overs into the knitting. On the following row the yarn overs are simply pushed (or "dropped") off the needle, creating a rather loose fabric, which is ideal for scarves and other flowing garments.

For the sample below I used Stylecraft Kon - Tiki - a blend of 50% cotton and 50% acrylic. Kon - Tiki has a very soft feel to it and I enjoyed knitting with the yarn. That's why I was surprised to see that it has primarily been used for knitted dishcloths on Ravelry. Let's see whether I can put the balance right and find a slightly more appealing project for my stash of  Kon - Tiki.

For all knit stitch patterns and weekly swatch posts, please follow this link to my knit stitch library.

Drop Stitch Swatch (Yarn: Stylecraft Kon - Tiki)