Showing posts with label Destash. Show all posts

Saturday 28 September 2019

Doll Customising: Easy Beginner Projects - Acrylic Yarn Wigs

Getting Into Doll Customising 

Regular readers of my blog will have noticed that I have been busy creating a number of custom outfits for Monster High and other dolls over the past months. I have to confess, by now my interest in doll customisation has become a bit of an obsession, judging by the time I spend marvelling at the many fantastic custom creations available on the web. 

Though I have been aware of the existence of custom or ooak (one of a kind) dolls for a number of years, especially since many Blythe doll collectors roaming the craft scene are very accomplished knitters and crocheters. Yet, I didn't feel confident enough to launch into my own custom projects for a long time. 

What's more, doll customising sounds like a bit of an obscure past time, especially for grown-ups. For this reason, I felt reluctant to admit to myself that I actually felt intrigued by it. So intrigued in fact, that I would want to give it a go myself.

Despite its growth over the past decade thanks to social media platforms such as Tumblr, Pinterest and Youtube, the community of doll customisers is still comparatively small and the number of  tutorials and readily available information on techniques, tools and materials is consequently rather limited, especially when compared to mainstream crafts such as sewing, knitting, or crocheting. Due to their familiarity with materials and tools in use by doll customisers, all those familiar with model-making are likely to have an advantage when branching into the custom doll sphere. For a knitter like me, doll customisation is entirely new territory.

Monster High Acrylic Yarn Doll Wig

Friday 15 December 2017

Knitting for Dollcena Takara Tomy Dolls


After knitting a pencil dress with sock yarn for this Takara Dollcena doll, I decided to make another in black (also with sock yarn). Project instructions will follow. Soon. I hope.

Here's the prototype.

Pencil Dress for Takara Tomy Dollcena Doll, hand-knit with Araucania Botany Lace 


And here's a preview of the little black pencil dress: 

Dollcena Takara Tomy doll in hand-knit pencil dress

Dollcena Takara Tomy doll in hand-knit pencil dress

Dollcena Takara Tomy Doll in Handknit Pencil Dress (Sock Yarn) - Beaded I-cord Halter 

Dollcena Takara Tomy Doll in Handknit Pencil Dress (Sock Yarn) - Beaded I-cord Halter


Sunday 6 September 2015

Unravelling Old Projects: Musings on Reckless Beginner Knitting and Body Image

In the interest of frugality, I will be unravelling a project from the very early stages of my 'knitting career'. This was a time when knitting a gauge swatch was such a bore, adequate measuring (of myself and the swatch) appeared mysterious and incredibly complicated, blocking didn't exist and, due to a lack of familiarity with materials, I habitually chose the most unsuitable yarns for my projects. 

Hopelessly Oversized Asymmetrical Cardigan (completed circa 2010 / 2011)

I'm sure many other beginner knitters will be familiar with this cavalier attitude: You feel excited by the very fact that you mastered the basics of knitting and you just want to get on with it. Every project therefore turns into a test, attempting new techniques and more challenging pieces, rather than paying attention to the necessary groundwork, i.e. jumping through the hoops of all the preparatory steps before casting-on in earnest.  


I adopted this rather nonchalant attitude in two of my earliest projects: a jumper and an asymmetrical cardigan. And even though every seasoned knitter drew my attention to the importance of gauge, selecting suitable materials or the necessity of blocking, I chose to ignore all of this well-intentioned advice, knowing in the back of my mind that I was en route to Disappointment Central.


Saturday 17 January 2015

Saturday 27 September 2014

Why Knitting for Charity? Why Knitting for Pine Ridge?


The onset of yet another Age UK / Innocent Big Knit campaign prompted me to start reflecting on charity knitting. Perhaps, I should mention that the topic of charitable knitting is vast: Some charity knitters specialise in particular accessories required by hospital patients, those in remission or patients with chronic conditions. Others knit for animal shelters. Some of us also produce custom-made items, clothes for birds after oil spills, for example. I also thought of those knitters, who produce clothing for premature babies and especially those of us, who cast-on for baby burial gowns.

Talking about charity knitting can thus come across as bleak, and this is perhaps one of the reasons why I've so far always refrained from writing about it. After all, this blog is intended to be my creative leisure pad. I'm also aware that knitters generally have strong opinions when it comes to discussions on charitable knitting, with some of us raising the question whether there is a place for charitable knitting in this day and age, given the abundance of mass-produced clothing. 


Badlands, Pine Ridge Reservation, Photo: Patrice Ouellet, more here.

Thursday 11 September 2014

Free Pattern: The Nameless Choker

Nameless


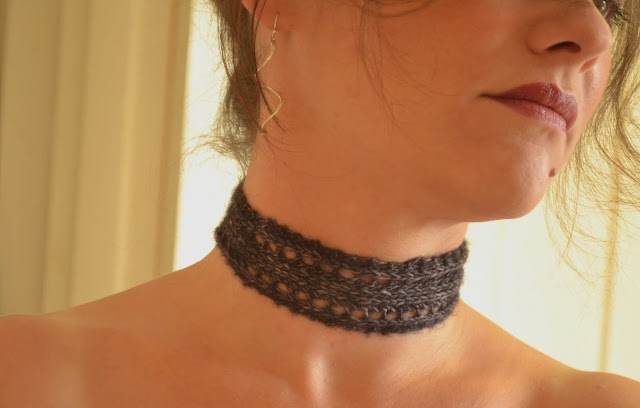
The Nameless Choker is a simple and quick lace project, specifically designed to use up a small quantity of sock yarn (approximately 10 - 20 grams), i.e. roughly the amount of yarn you might have lying around following the completion of a larger project. The quantity of yarn I used for my choker hardly registered on my set of kitchen scales and the above estimate is rather conservative.

It is also an ideal pattern for beginner lace knitters, wishing to get to grips with two of the most common knitting decreases (k2tog and ssk), without having to commit too much time or too many resources; or for all those knitters who enjoy creating knitted accessories and jewellery, either for themselves or for others.


Materials

You will require the following materials:

  • approximately 10 - 20 grams of sock yarn (for my choker I used Madelinetosh Tosh Merino Light Sock Yarn in Victorian Gothic)
  • 3mm knitting needles (or the size specified by the yarn manufacturer)
  • scissors
  • darning needle 
  • 2 buttons 

Nameless Choker in Progress

Gauge

Gauge is not essential for this project but you should have a rough idea of how stretchy your chosen yarn is. This is a made-to-measure project, and as neck circumferences differ, you will have to regularly check whether your choker has reached the desired length. If you decide to knit this project with an unfamiliar yarn and you are not entirely sure how far it will stretch after blocking, it may be beneficial to knit a small gauge swatch and block this in order to get an idea of how the yarn will behave and, most importantly, to check its stretch.


Nameless Choker in Progress


Project Instructions

  • Set - up:

    • Cast on 12 stitches, using whichever cast-on method you are most comfortable with.
    • Knit 4 rows

Once you have completed the set - up, you are ready to start on the lace sequence of the pattern:

  • Lace Pattern:

Row 1: K3, YO, K1, K2tog, SSK, K1, YO, K3
Row 2: K2, P8, K2
Row 3: Repeat Row 1
Row 4: Repeat Row 2

Keep repeating the above sequence until both ends of the choker almost meet, when it is fitted for measuring. Bearing in mind that the choker should fit relatively tightly around the neck, I left a gap approximately as wide as the top of my index finger to allow for a snug fit following blocking. 

When your choker has reached the desired length, stop knitting the lace sequence on a purl row. Next, continue knitting three rows in garter stitch and proceed to bind off.

Nameless in Madelinetosh Tosh Merino Light (Victorian Gothic)
  • Blocking:

Blocking your choker is an absolute must in order to open up the lace. I opted for wet-blocking.

  • Finishing:
Following blocking, it is time to sew in ends and to add two buttons for fastening the choker. The buttons can be attached to either end of the choker. I decided to place mine on the cast - off edge, as this usually turns out slightly wider, directly underneath the openings of the yarn over increases. The  first holes created by the yarn over increases on the opposite end will serve as button holes.

Your choker is ready to be worn. 

Nameless in Madelinetosh Tosh Merino Light (Victorian Gothic) 

Enjoy!

! Update: One year on, I am revisiting the Nameless Choker. I am currently in the process of adapting the pattern to non-traditional knitting materials (cotton thread / leather etc). More on this venture is available here. !

! Update: I have designed another lace choker pattern (image below), the Brocade Choker. My pattern is available here. !

Brocade Choker Knitting Pattern


For pattern support, please feel free to contact me via Ravelry (ClariceAsquith), Twitter (@Slipstitched), leave a comment below or by e-mail: clarice.asquith@googlemail.com.

This pattern is for personal use only and may not be reproduced for commercial purposes without permission.

An update on knitting a variation of this pattern (pictured below) with non-traditional materials is available here


Nameless Cuff, More here.


Nameless Cuff, More here.

© 2014 Clarice Asquith. All rights reserved. http://makedoandmendnovice.blogspot.com

Friday 8 August 2014

Those remnants of precious sock yarn


Choker in Madelinetosh Tosh Merino Light 

Following completion of a project, all of us are faced with the challenge of putting yarn left overs to good use. Some of my spare yarn gets turned into swatches and smaller amounts end up as stitch markers. Yet, in the case of precious sock yarn, I always try to create a small pattern specifically designed for the amount of surplus yarn.

The remnants of the Madelinetosh Tosh Merino Light, which I used for the Freestyle Raglan Cardigan, were turned into a choker. 


Sunday 11 May 2014

The Freestyle Raglan Cardigan - Project Instructions

Surprisingly pleased with my first freestyle raglan cardigan, I decided to knit another, this time keeping a record of my project instructions.


Knitted seamlessly from the top down, this is a made to measure project without a written pattern as such. 

The number of cast - on stitches depends on your gauge swatch, your own measurements, the chosen needle size and the type of wool you are using. The pattern allows for modifications at every step of the way and what follows are my instructions for a cardigan in size S, knitted in stockinette stitch, with garter stitch edging at the bottom.

Should you wish to use another stitch motif, you simply have to knit the gauge swatch in the desired stitch and derive your measurements from your test swatch.


I used the following materials:

  • Yarn: Madelinetosh, Tosh Merino Light (Sock Yarn) - 1 hank

  • Needle: 5mm (US size 8) circular needle, 4 double - pointed needles (5mm / US size 8)

  • Scrap yarn, 4 stitch markers, scissors, darning needle 


Madelinetosh Tosh Merino Light Sock Yarn, Colourway: Victorian Gothic


Madelinetosh Tosh Merino Light Sock Yarn, Colourway: Victorian Gothic


Prepare your gauge swatch and block it in whichever way you see fit. Count the stitches and calculate the number of stitches against the measurement of the gauge swatch: In my gauge swatch, 26 stitches in stockinette stitch measured 10cm exactly. 


Gauge swatch in stockinette stitch.


Next, you will have to determine how many stitches are required for the neckline of your cardigan. You can either measure yourself or, as this is not always as straightforward, opt to measure the neckline of an existing garment. My neckline measurement was 51cm.

Once you have determined the neckline measurement, you calculate the number of stitches to be cast on proportionally:

The general calculation looks as follows:

(measurement of desired neckline x number of stitches in swatch sample) / measurement of swatch = number of required stitches 

For my cardigan, the calculation looks like this: 

(51cm x 26sts) / 10cm = 132.6sts


I rounded the stitch total to 135, in order to easily divide the stitches between the various sections.


Once you have determined the number of stitches required, you are ready to start knitting:


Cast on 135 stitches:

  • 1st row: knit all stitches
  • 2nd row: purl all stitches

(After completion of this row, I decided to incorporate a button hole at the beginning of the next row, but this is entirely optional.)

Next, divide stitches between markers for the front, back and the two sleeve sections: 

  • 45 for the back section, 46 in total for the front sections and 22 stitches for each sleeve section
  • 3rd row: knit 23, place marker, knit 22, place marker, knit 45, place marker, knit 22, place marker, knit 23
  • 4th row: purl, slipping markers as you complete the row

From the next row onwards, you start the Raglan increases. Until you are able to fit your arms comfortably through the sleeve sections, the number of stitches will have to be increased as set out below.

  • 5th row: knit to two stitches before 1st marker, kfb, knit, slip marker, kfb, knit to two stitches before next marker. Continue increasing the stitch count as set-out above until the row row is complete, increasing one stitch before and after each marker.
  • 6th row: purl all stitches slipping markers as you complete the row


Continue in stockinette stitch, increasing stitches before and after each marker on every knit row as shown above.

Continue knitting in stockinette stitch until your arms fit through the sleeves. (I increased the sleeve sections from 22 stitches to a total of 45 stitches between markers.) 

When the sleeves are wide enough and the fit is comfortable, proceed as follows:

  • Knit to 1st marker, remove marker, place all stitches between markers on scrap yarn. Remove second marker. Join first front section with back section, continue knitting to second sleeve section, remove first marker, place stitches between markers on scrap yarn, remove second marker, join back section with second front section. Proceed to knit until end of row. 


Proceed to knit in stockinette stitch, removing all markers until your cardigan has reached the desired length. (You will have to keep checking the fit of the cardigan whilst knitting.)

Once your cardigan has reached the desired length, knit 4 rows in plain garter stitch (to avoid rolled edges) and bind off.


Having completed the Torso, it's time to move on to the sleeves: 

As pictured above, the live sleeve stitches are held on scrap yarn. Divide these stitches evenly between 3 double - pointed needles and remove the scrap yarn. To give the sleeves a neater look and to avoid the appearance of "underarm holes", pick up a few stitches underneath the arms, where the front and back sections were originally joined. This will stabilise the sleeve and create an overall tidy appearance.

It is now up to you to decide, how long the sleeves should be. As I wanted to use one skein of sock yarn exactly, I settled for short sleeves, which only required me to knit three rows in the round until bind-off. 

Once you have completed the sleeves, your cardigan is ready to be blocked.

As this garment is knitted in one piece, blocking can be quite a challenge and I decided to pin it against my dressmaker's dummy, whilst steam - blocking the fabric.  


Should you require pattern support, please feel free to contact me via Ravelry or leave a comment below.

This pattern is for personal use only and may not be reproduced for commercial purposes without permission.


© 2012 Clarice Asquith. All rights reserved. http://makedoandmendnovice.blogspot.com


Sunday 30 March 2014

A Lesson in Hanging on...until the time is right for steam blocking

Introducing The Freestyle Raglan Cardigan


A rather interesting project, one that's been on the needles since August 2011. At the time, I attempted my first cardigan. I wasn't following a "pattern", instead the project was knitted top - down, according to swatch and proportion.

As mentioned, no written pattern was followed as such, just basic project instructions along the lines of: 

Measure swatch, measure yourself, block swatch, calculate stitches required around collar in proportion to swatch sample, cast on equivalent number of stitches, divide stitches, place markers, memorise increase pattern, go forth and knit ...


Sunday 16 March 2014

The Garter Stitch Brain Cleanser ...or Can you Block Acrylic Yarn?


Baktus Scarf


Update: Project notes for a modified brain cleanser baktus are now available here.

Strikkelise's Baktus pattern  has been on my "to -knit-list" for quite a while, but I had never quite gotten into the right state of mind for a project knitted entirely in garter stitch until now. Knitting in garter stitch throughout can be quite a repetitive endeavour, which I highly recommend as a brain - cleansing activity. To incorporate a little more of a challenge, I decided to knit my Baktus in two colours and I wanted to use the most inexpensive yarn I could find in my cupboard (...and still achieve a presentable look).

The yarn for this project was a charity shop find. I was unable to ascertain the manufacturer and only have a vague idea on the composition. A label on the inside of the heather - coloured cone tells me that the yarn contains 30% wool, with the remainder being acrylic. I assume that the same applies to the grey cone, but I could be wrong. I also assume that  Yeoman's are the manufacturers of the yarn. (Yeoman's produce machine knitting yarn, which is sold on cones.) But I could be wrong on this, too.


Sunday 9 March 2014

The Last of the Vintage...or an ideal yarn for beginner lace knitters

...and with a little melancholy, I note that I have used up the last balls of Patons UK Vintage. Well, never mind I'm quite happy with the finished object.


Introducing: The Oaklet, aka the Last of the Vintage

The designer is Megan Goodacre. The yarn (Paton's UK Vintage) was purchased a long time ago at Kemp's and has long since been discontinued. I have used Vintage in several projects and, even though it's not an overtly pretty yarn (in all honesty, the colourways are somewhat questionable), I feel a little sad to see it go. 


Megan Goodacre's Oaklet Shawl Pattern

Sunday 6 October 2013

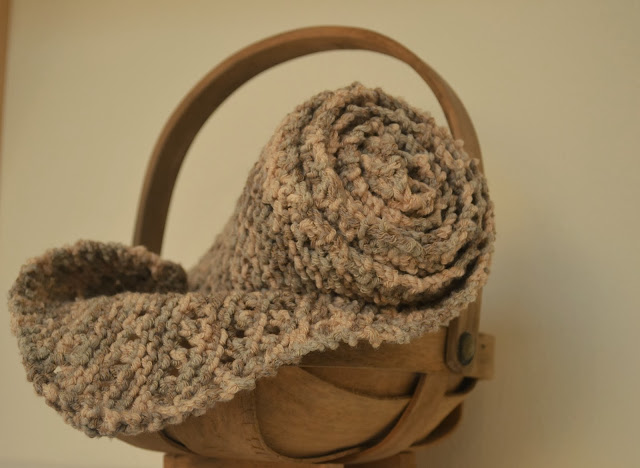
Noro Bias Lace Scarf in a Less Than Posh Yarn

Bias Lace 

Another project, completed entirely during the daily commute. It turned out to be an excellent commuter knit for several reasons:


Friday 4 May 2012

Design Digest: Ammonite - Part I


Ammonite and the Grey Cone...

If you are reading this post, I suppose you have seen Ammonite on Ravelry or on Flickr and you might want to know a little more about the design process and my inspiration for the pattern. Perhaps you have merely stumbled upon this blog because you are interested in knitwear design or maybe good, old Google directed you to this page because you are interested in fossils.


If you are looking for fossil - related information (and I don't mean the knitted kind), I have to disappoint you, as I am going to talk about a knitting pattern and, unless you are interested in knitting, what follows will not be a great deal of help to you.

So, Ammonite...It's probably best to start at the beginning. Roughly a year ago I was browsing in a local charity shop and found a cone of grey DK - weight yarn. There was no further information regarding the identity of the yarn, only a label inside the cone stating it was an acrylic / wool mix (30% wool, 70% acrylic). Having done a bit of research, I now believe that the yarn was manufactured by Yeoman Yarns in Yorkshire, an interesting yarn manufacturer, especially for the thrifty knitters amongst us. Yeoman's yarns come wrapped around cones, presumably targeting machine knitters. (And the big advantage of yarn on cones is of course the fact that you won't run out of yarn during your project.)

Mietze inspecting 

As this poor, grey cone was looking a little lonely, I decided to buy it at a bargain price together with two others, one in heather and another in a light creamy brown. The lovely people at the shop must have been glad to see them go and included a pair of knitting needles at the till. 

Here I was with my yarn bargains. I took them home, where they were subjected to the usual "scratch and sniff " inspection by a member of the feline quality control squad. 

Grey Cone and Friends

Monday 2 January 2012

Citron - Finally Finished

Citron in Patons UK Misty

It's taken a fair bit of time to complete this project, three months to be precise. Nevertheless, Citron, a semi - circular shawlette, is finally finished. The pattern designer is Hilary Smith Callis and written instructions can be found in the winter 2009 edition of Knitty


For this project I decided to attack my stash of Patons UK Misty, which I bought as a substitute for Rowan Kidsilk Haze. (More on substituting Rowan Kidsilk Haze with Patons UK Misty can be found in a previous blogpost.)


Citron in Patons UK Misty

On the whole, I am happy with the yarn, even though it split unexpectedly on two occasions, but this was easily rectified.

Wednesday 9 November 2011

Another Project: The Knitted Cat Tunnel

When visiting a friend, I observed her cats diving in and out of a polyester / nylon cat tunnel. Our cats can also be found playing in enclosed spaces, especially underneath duvets and  blankets. When I saw how much her cats enjoyed playing in the tunnel, I contemplated purchasing one for ours, but on second thoughts I found  the material of the so-called cat caves, which are either made from nylon or polyester, somewhat off - putting. Given the choice, I knew that Pickle et al. would prefer hiding and resting in a cozy, knitted object. After all, they choose to fall asleep on my knitting projects. And so the idea for a knitted cat tunnel was born.

Cat Tunnel in Sirdar Big Softie

The following is not so much a knitting pattern, rather a description of my project in stages. It is suitable for the beginner knitter, as it only requires knowledge of a few knitting basics:
  • You will need to be able to cast on and off.
  • You should feel reasonably comfortable knitting on circular needles.
  • You need to be familar with the knit stitch.


Cat Tunnel in progress.


I used the following materials:

  • Bulky yarn of your choice. For my project I used approximately 10 skeins of Sirdar Big Softie. This included the yarn needed to sew in the plastic tubing at either end of the tunnel. As this project is a great exercise in stash busting, you could use yarn leftovers, provided they are of similar thickness.


    Knitted Cat Tunnel in Sirdar Big Softie

  • 10mm circular knitting needles (US size 15).

  • 10mm crochet hook (US size N/15) for finishing, sewing in yarn ends and incorporating the plastic tubing. (This can also be done with a large darning needle.)

  • Plastic tubing approximately as thick as a standard garden hose (see picture below), available at hardware stores. The length of the tubing is dependent on the circumference at the openings of the tunnel, and I would recommend buying the tubing, once you have completed knitting the tunnel and taken actual measurements of the openings.

  • Tape measure, scissors and a Stanley knife (for cutting the plastic tubing).

  • Two wooden plugs or sturdy parcel tape to join the plastic tubing

  • At least one playful feline, who will appreciate your crafting efforts.


    Pebble checking on progress


Instructions for a giant slouchy cat tunnel (40cm wide and 70cm long):

Begin by casting on 90 stitches using whichever method you prefer. (I used the cable cast on.) If you want a wider tunnel, cast on more stitches. If you want a smaller tunnel, reduce the amount of cast on stitches accordingly.

Place marker to mark the beginning of the round and join. 

Knit mindlessly until the tunnel has the desired length. My tunnel is approximately 70cm long and 40cm wide.

Proceed to bind off all stitches and weave in ends.

After you have finished knitting, you may wish to block the piece in order to stretch and straighten the material. I skipped this part.

Measure the circumference of the tunnel openings at either end to determine the required length of the plastic tubing. The plastic tubing I have chosen has the thickness of a domestic garden hose. 

Once you have cut the tubing to size with a Stanley knife, the ends of the tube have to be joined to form a circle. This can be achieved by glueing the ends together with sturdy parcel tape. Alternatively, you can join the ends with the help of a wooden plug, which will ensure a snug fit. (See picture below.) Before fitting the plug, briefly insert the tubes into hot water. This will cause the plastic to expand and the plug can be inserted easily. When the plastic has cooled down, the plug should fit tightly.


When the ends of the tube have been joined, proceed to sew the tube circles into the edges of the knitted tube, using the rolled up edges of the fabric as a guide.  


Having followed these steps, your cat tunnel is ready to be enjoyed destroyed (for your cats' safety obviously only under the supervision of a responsible human).


And here are a few impressions of how the tunnel was received by Pickle, Mietze and Pebble: 


Mietze enjoyed it as a seating facility until she was disturbed by Pebble.